
By Woody Adams
NOTE: This article addresses any possible conversion work related to Merchant Accounts, Payroll and Inventory. Woody pulled this post conversion doc together from various existing KB articles on the subject.
Merchant Services/Credit Card Processing
The QuickBooks Online Recurring Transactions process is not the same as the Merchant Service ReBill feature which is only available in the Merchant Service Center. The QuickBooks Online Recurring Transactions integrates payments with your QuickBooks customers. The Merchant Service ReBill feature does not integrate with QuickBooks Online and should not be used. For this reason, all recurring transactions templates have to be RECREATED in the new QuickBooks online file. Once created in the New QuickBooks Online, delete the Rebilling transactions in the Merchant Services Center to ensure there is not duplicate processing and charges incurred.
Suspend the recurring payments first with MAS team or suspend it yourself thru the MSC. (merchant service center)
Unlinking/Linking merchant account from QuickBooks Desktop first:
Check the Recurring Charges set up within QuickBooks Desktop: (must login as QuickBooks Admin user)
- The recurring charges need to be turned off in order to avoid double-charging the customers.
- If you set them up in the merchant service center, you log in to that and suspend them there, or you can call the MAS team and they can do it, 800-558-9558.
- If you setup recurring charges in QuickBooks Desktop: Choose Customer > CC Processing Activities > Automatic Credit Billing > Suspend. Click Suspend for each recurring charge.
Linking your merchant service to QuickBooks Online:
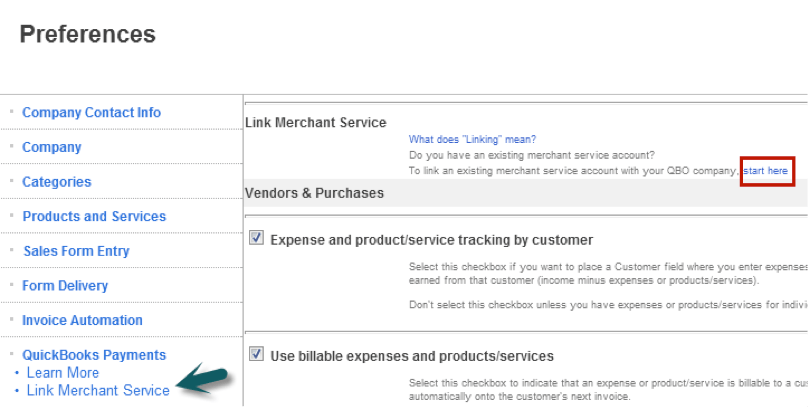
- Sign in to QuickBooks Online.
- Click Gear Icon, Settings, Company Settings, QuickBooks Payments, Link Merchant Service
- (Old QuickBooks Online: Choose Company > Preferences > Accept Credit Cards.)
- Click start here as shown in the image below:
Once the payment account is detected, you’ll see a screen like this. Click Next to proceed.

When the account has been successfully linked, you’ll receive a confirmation page like below. Click Done.

Because the account was successfully linked, in preferences you’ll see a Linked payment account section showing that your QuickBooks Online company is currently linked to a payment service.

Notes to Consider:
- Depending on the specific type of merchant account you have, you may not be able to link it from the website. In that case, you’ll need to call Payment Services support at 800.558.9558 to complete the process.
- If you want to unlink the currently linked account and link another, you’ll have to contact Payment Services support at 800.558.9558.
Set up a recurring monthly charge for a credit card, simply create a Recurring Transaction.
Create a Recurring Sales Receipt for monthly charges:
- Click Gear Icon, Lists, Recurring Transactions
(QuickBooks Online Classic) Choose Company > Recurring Transactions.
- Click New.
- For Transaction Type: select Sales Receipt and click OK.
- Enter in a Template Name
- Choose the Template Type as Scheduled.
- Check box to Automatically send emails. The customer will receive an email each time their card is charged.
- Choose Customer: drop down menu
- Set the Interval of when to charge your customer
Note: If you use the “Days in advance to create” option when setting up a sales receipt for a recurring charge, the charge will process on the date the transaction is created, not on the transaction date. For example, a sales receipt that recurs on the 15th of each month, if created 10 days in advance, will process the credit card charge on the 5th of the month.
- Enter in all appropriate billing address info
- Choose which credit card type for the Payment method.
- Click Enter credit card details
- Fill out products or services you are selling, etc.
- Save template.
Payroll to New QuickBooks Online
A basic conversion into the New QuickBooks Online occurs at the transaction and employee level and includes payroll transactions, though not payroll detail information.
- Transactions and payroll accounts are converted in order to balance your books, but details behind the transactions (such as payroll item breakdown and employee year-to-date numbers) does not convert.
- Paychecks and liability payments convert as regular checks. These checks do not convert to the QuickBooks Online Payroll module. But during QuickBooks Online Payroll setup, you will have opportunity to enter YTD amounts.
- Liability refunds, adjustment transactions, and opening balance transactions that affect accounts convert to journal entries.
- Basic information about employees is converted, but their payroll information does not. After you convert your data, you can sign up for QuickBooks Online Payroll and walk thru the payroll setup interview for all employees, items and history. You will then be ready to create paychecks and manage your payroll through QuickBooks Online. When you set up payroll, you are asked if another payroll system was previously used. Choose yes. This will allow you to enter year-to-date information for each employee and report any previous liability payments.
(Woody also has a short video detailing this process here.)
Inventory
It is important to mention, if I had a QuickBooks Desktop file with inventory, I would NOT convert it to my QuickBooks Online subscription. Instead, I would start the QuickBooks Online account from scratch, importing the lists, entering an opening balance journal entry and any open transactions, choosing to forgo the historical data. The QuickBooks Online data will start clean, and the time it will take to run thru the below steps to resolve post conversion inventory issues might not be worth it in most cases…
Let’s say you have just imported your company file from the desktop edition and you were using inventory. Your inventory parts would have been imported but won’t yet be set up as inventory in QuickBooks Online yet.
We have some steps you can take to get everything set up properly using the inventory valuation summary report. Note that this solution becomes increasingly more difficult the longer you wait after importing because buying and selling products after you’ve imported them can affect your numbers.
- In the QuickBooks Desktop file, Choose Reports > Inventory > Inventory Valuation Summary.
- In the Dates drop-down, select All.

- In QuickBooks Online, print a Balance Sheet report (Reports > Recommended Reports > Balance Sheet). Choose All Dates then click on Print tab. This way you’ll have a before and after report after you’ve made your changes.
- In QuickBooks Online, click Gear Icon, Settings, Company Settings
- Click on Sales tab on left, then the Edit icon to the right of Products and Services
- Check box to track quantity on hand, the default is set to Off, now it will be On.
- This move creates an Inventory Asset-1 account on the chart of accounts. The reason for this is the conversion from QuickBooks Desktop already created an Inventory Asset account on the Chart of Accounts, with a current balance for all dates.
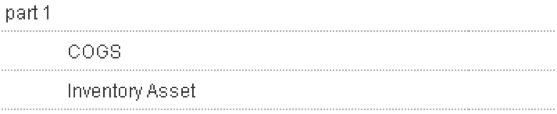
- Click the Gear Icon in upper right of QuickBooks Online file, Lists, Products & Services List. You will notice that every item in this list that was an inventory part in QuickBooks Desktop has two sub items under it, one for Cost of Goods Sold and the other for Inventory Asset. These are not accounts, but items added to make sure the reports are correct now that the data it in QuickBooks Online. We will be eventually deleting these sub items. Looks like so:
- Highlight the parent item and click Edit tab at top of the Products & Services list
- Check the box, I track quantity on hand for this product…
- In the Initial quantity on hand field, enter the exact quantity found in the valuation report (see the screen shot below) and a date. Note: After the inventory quantity and as of date are entered, no transactions prior to that date can be created.
- Choose the Inventory Asset-1 account for the inventory asset account.
- In the Purchasing Information section, enter the exact cost from the QuickBooks Desktop inventory valuation summary report.
- In the Sales Information section, enter the sales price if not there already from the conversion (it should be there).
- Click Save. (Upon saving the change, an inventory adjustment is made crediting Opening Balance Equity and debiting the Inventory Asset account. However, now you have just doubled your inventory asset which is not correct. Please see Step 21 below to resolve with a journal entry…)
- Go back to the Products and Services List and click to highlight the sub-product named Cost of Goods Sold under the product in question.
- Click Delete, then Yes.
- Go back to the Products and Services List and click to highlight the sub-product named Inventory Asset under the product in question.
- Click Delete, then Yes.
- You’ll need to repeat this process for each “inventory” item converted from QuickBooks Desktop to set up its quantity and cost and inventory asset account.
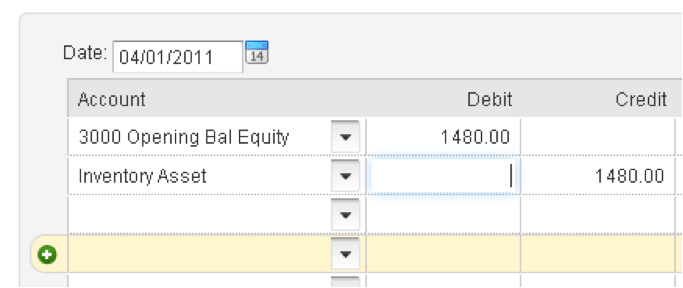
- Finally, you need to make a Journal entry in QuickBooks Online to resolve the duplicate inventory asset balance caused by inventory adjustment created when you enter the initial Quantity on Hand for the products & services. Check out this example:

- The journal entry needs to debit the Opening Balance Equity account and credit the Inventory Asset account that was generated from the conversion from QuickBooks Desktop. Do not credit the Inventory Asset-1 account as that has the current balance for QuickBooks Online and will be your inventory asset account going forward. The Journal Entry looks like this:
- Once done, go to your chart of accounts and either delete the old Inventory Asset account or merge it into the Inventory Asset-1 account. I suggest merging, because who wants a -1 in the account name?
- How to Merge:
- Edit the old Inventory Asset account from the Chart of Accounts
- Change the detail type from other current assets to inventory
- Delete the account number if there is one
- Change the account name to Inventory Asset-1 and click Save
- Click Ok to warning about changing the detail type of an account
- Click Ok to warning about merging accounts
- Edit the Inventory Asset-1 account
- Remove the -1 and click Save.
(Woody has a short video detailing this process here.)
Bonus–How to Reset Your QBO Data During the First 60 Days
You can do this if you are within 60 days of starting your your QuickBooks Online subscription.
Caution: Please keep in mind that this process will delete any data that has already been entered into the company. Once the data is deleted it cannot be restored or reversed.
- Log in to your QuickBooks Online company file
- Change the URL to include /purgecompany (EXAMPLE:
URL shows: https://qbo.intuit.com/c28/app/homepage
Change to: https://qbo.intuit.com/c28/app/purgecompany) - The next screen will provide a summary of the items being deleted. In order to confirm that you do understand the data will be deleted you must type in the word Yes and click OK.
- If the industry you desire to select is different than the one showing feel free to change and mark whether you would like the system to create accounts based on your industry or start with an empty chart of accounts. Once your selections are complete, click Wipe Data.
- When the deletion is complete you will be rerouted to your home page.
- If you select an empty chart of accounts, there will be 2 accounts in the file, Retained Earnings and Services Income (or whatever income account based on the industry type you selected in Step 4).
- Note: It is just as easy and maybe even better to re-export your QuickBooks Desktop file to the same QuickBooks Online subscription.

This article is taken from 3 separate KB articles re MAS, Payroll and inventory. I didn’t so much write it as conglomerated the info into one go to article. Please, I am not that awesome.